
📍 Overview
The enhanced List View experience in Followup CRM helps teams work faster and stay organized by improving:
- 📂 Saved Lists
- 🔍 Advanced Filtering
- 📅 Date Filtering
- ↕️ Multi-Column Sorting
- 👥 Shared Views
- 💾 Saved States
- 📊 Table Layouts
These enhancements are available across:
- Projects
- Contacts
- Companies
⚙️ Step-by-Step Instructions
1️⃣ Create and Save a List View
To save a custom filtered view:
- Open your Projects, Contacts, or Companies page
- Apply filters using Advanced Search
- Click Save List
- Enter a name for the list
- Click Save
✅ Your saved list will now appear in the top-left area next to:
📂 All Lists
2️⃣ Manage Saved Lists
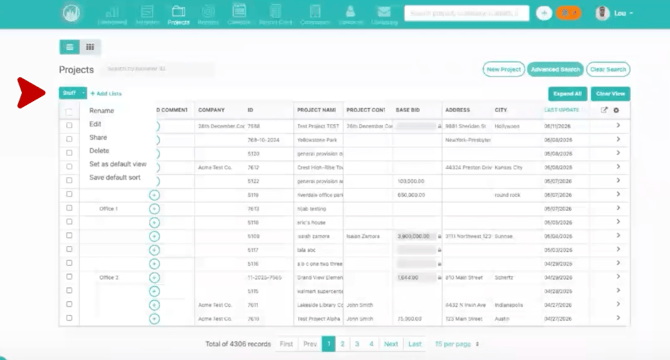
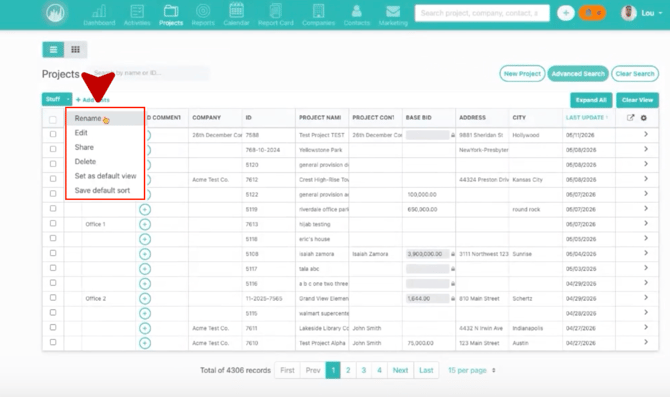
Open the saved list menu to access additional options.
Available actions include:
- ✏️ Rename
- ⚙️ Edit
- 👥 Share
- 🗑️ Delete
- ⭐ Set as Default View
- ↕️ Save Default Sort
These options allow teams to fully customize how lists behave.
3️⃣ Use Enhanced Date Filters
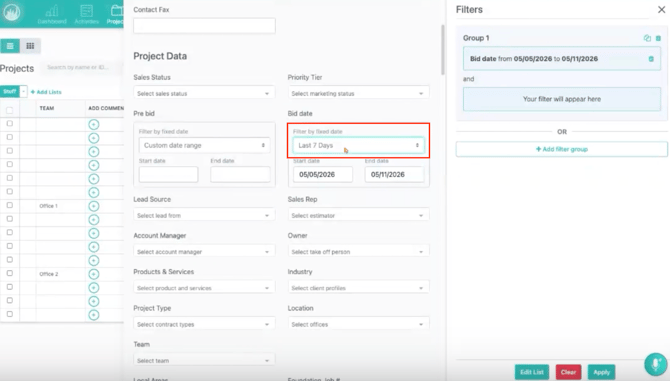
Date filtering now includes quick-select presets for faster searching.
Available options include:
- 📅 Today
- 📅 Yesterday
- 📅 Last 7 Days
- 📅 Current Week
- 📅 Month to Date
- 📅 Last 30 Days
- 📅 Custom Date Range
This is especially useful for fields like:
- Bid Date
- Activity Dates
- Project Dates
✅ No need to manually enter date ranges each time.
4️⃣ Share List Views with Team Members
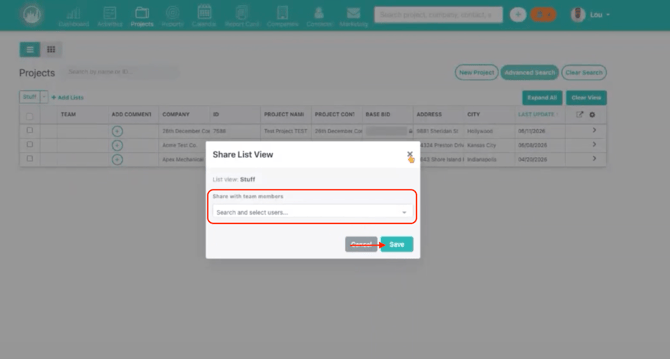
Saved lists can now be shared directly with users.
To share a list:
- Open the saved list menu
- Click Share
- Select one or more team members
- Confirm the selection
📌 The shared list will automatically appear in the recipient’s workspace.
5️⃣ Use Saved State Functionality
Saved lists now remember your workspace configuration automatically.
This includes:
- Applied filters
- Column widths
- Sorting preferences
✅ Your layout stays consistent every time you return to the list.
6️⃣ Apply Multi-Column Sorting
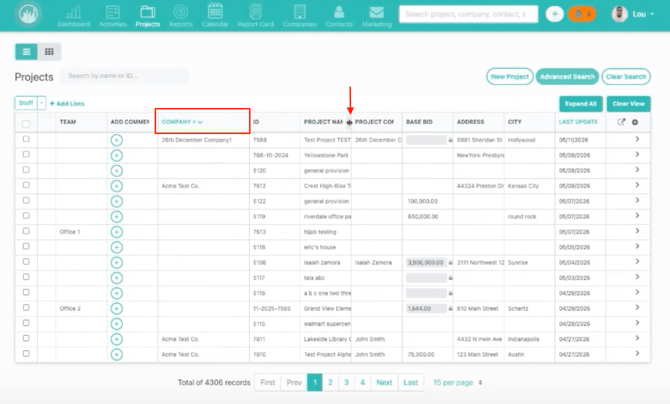
Sorting has been improved to support layered sorting rules.
To create a primary sort:
- Click a column header
To add a secondary sort:
- Hold Shift
- Click another column header
📌 This is especially useful when:
- Multiple records share the same primary value
- Additional organization is needed
7️⃣ Review the Improved Table Layout
The enhanced table layout improves readability by:
- Reducing blank space
- Improving column consistency
- Handling long text more effectively
- Making rows easier to scan
✅ This creates a cleaner and faster workflow experience.
✅ Result
After using the enhanced List View features, your team will be able to:
- Save reusable filtered views
- Share list setups with other users
- Filter records faster using presets
- Maintain consistent workspace layouts
- Apply advanced sorting logic
- Navigate cleaner and more organized tables
💡 Best Practices
✔️ Save commonly used filters as reusable lists
✔️ Set frequently used views as your default
✔️ Share standardized lists with departments or teams
✔️ Use date presets for faster filtering
✔️ Combine primary and secondary sorting for better organization
✔️ Keep layouts clean by adjusting column widths as needed
Happy Selling!