
Overview
Data Import helps you bring large amounts of information into Followup CRM without manually creating each record one at a time.
You can use Data Import to create or update records such as projects, companies, and contacts, depending on the import options available in your account.
The enhanced Data Import experience gives users more visibility and control with clearer field mapping, duplicate review, progress tracking, import history, percentage handling, and undo options where available.
⚙️ Step 1: Open Data Import
- Go to Company Settings.
- Select the Data Import tab.
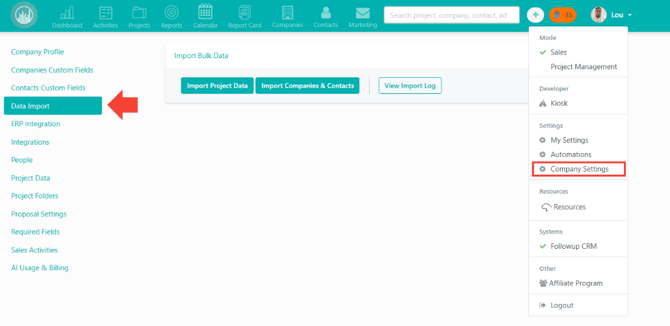
This page shows the import options available for your account.
Depending on your setup, you may see options such as:
- Import Project Data
- Import Companies & Contacts
📁 Step 2: Choose an Import Type
Select the type of data you want to import.
Choose Import Project Data if your spreadsheet contains project information.
Choose Import Companies & Contacts if your spreadsheet includes company information and related contacts.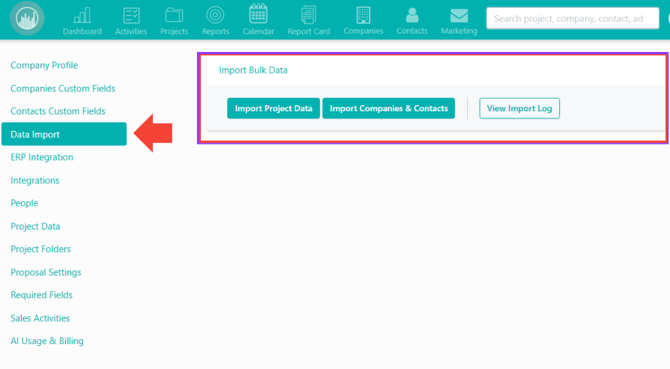
Note: Available import types may vary based on your account configuration and enabled features.
📄 Step 3: Upload Your Spreadsheet
Upload the spreadsheet file you want to import.
Before uploading, make sure your file includes:
- Clear column headers
- One record per row
- Required fields completed
- Valid email addresses
- Consistent date formatting
- Clean number and percentage values
- No unnecessary blank rows or columns
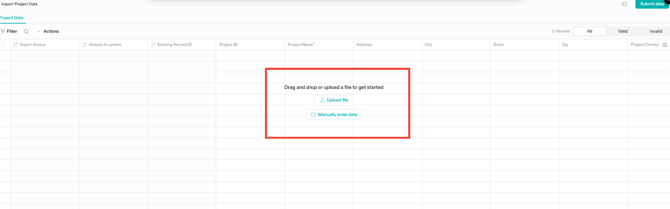
🔗 Step 4: Map Spreadsheet Columns to CRM Fields
Match each column from your spreadsheet to the correct Followup CRM field.
Examples:
- Project Name → Project Name
- Company Name → Company Name
- Contact Email → Email
- Sales Status → Sales Status
- Teams → Teams
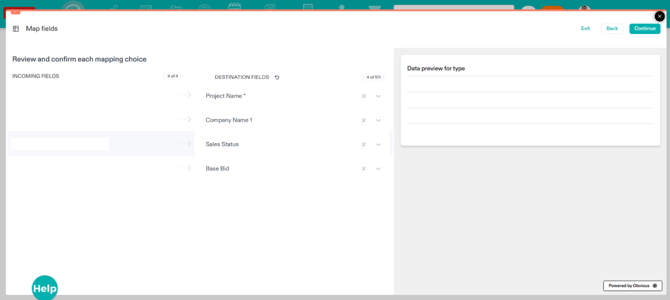
If your team uses custom field labels, the importer may display those labels during mapping. This makes it easier to match your spreadsheet to the fields your team already recognizes.
✅ Step 5: Review Validation Messages and Warnings
Before submitting the import, review any messages shown in the importer.
You may see warnings or errors for:
- Missing required fields
- Invalid email addresses
- Invalid dates
- Incorrect number formats
- Percentage formatting issues
- Dropdown values that need to be matched
- Duplicate or possible duplicate records
🔍 Step 6: Review Duplicate Records
If Followup CRM finds a record that appears to already exist, the importer may show a duplicate or possible duplicate warning.
An exact match may update an existing record.
A possible duplicate should be reviewed carefully before continuing.
Best practice: Review duplicate warnings before submitting the import to avoid unintentionally updating the wrong record.
🚀 Step 7: Submit the Import
Once all required fields are mapped and required errors are resolved, submit the import.
The import will begin processing in the background.
You can continue working in Followup CRM while the import runs.
📊 Step 8: Monitor Import Progress
After submitting the import, watch for the progress notification.
This helps confirm that the import is running and gives visibility into the processing status, especially for larger files.
🕓 Step 9: Review the Import Log
When the import is complete, return to the Data Import page and select View Import Log.
The Import Log may show:
- Who ran the import
- Import type
- Number of records processed
- Import status
- Completion date and time
- Error details, if any
- Undo option, if available
Common statuses include:
- In Progress
- Completed
- Completed with Errors
- Failed
- Undone
🛠️ Step 10: Correct Errors if Needed
If the import status is Completed with Errors or Failed, review the details in the Import Log.
Then:
- Open your original spreadsheet.
- Correct the failed or skipped rows.
- Save the updated file.
- Re-upload the corrected spreadsheet.
- Re-run the import.
If only some rows failed, re-import only the corrected rows when possible.
↩️ Step 11: Use Undo if Available
Some recent imports may show an Undo Import option.
Use this option if the wrong file was uploaded or if imported records need to be removed.
Important notes:
- Undo is only available for a limited time after the import completes.
- Records edited after the import may not be undone.
- Once the undo window closes, the import cannot be undone from the Import Log.
Result
After completing these steps, your spreadsheet data will be imported into Followup CRM. You’ll be able to review the import status, confirm which records were processed, correct any errors, and use the Import Log for tracking or undo options where available.
Best Practices
- Review your spreadsheet before uploading.
- Use clear and consistent column headers.
- Remove blank rows and empty columns.
- Confirm required fields are completed.
- Use consistent date, number, and percentage formats.
- Review duplicate warnings before submitting.
- Run a small test import before importing a large file.
- Re-import only corrected rows when fixing errors.
- Review the Import Log after every import.
Happy Selling!