Step 1: Add a New Sage 100 API User (SQL Admin)
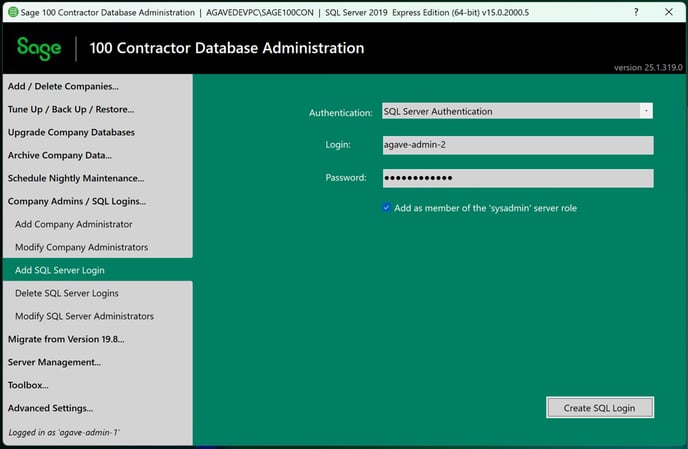
Begin by creating a dedicated SQL user account in Sage 100 Contractor for the integration. On the Sage 100 server, open the Sage 100 Contractor Database Administration tool. Under the Company Admin / SQL Logins section, select Add SQL Server Login. In the dialog, choose “SQL Server Authentication,” enter a username (e.g. agave-admin) with a strong password, and check the option to add this user as a member of the sysadmin role. After creating the SQL login, verify it has sysadmin privileges (for example, using the Modify SQL Server Administrators screen, ensure the new login is listed and checked as a sysadmin). Finally, add this new user as a Company Administrator for your Sage company database (select your company and assign the user, then click “Create Admin User”) This user will be used by Agave to read/write data.
Step 2: Create an “API” Security Group in Sage 100
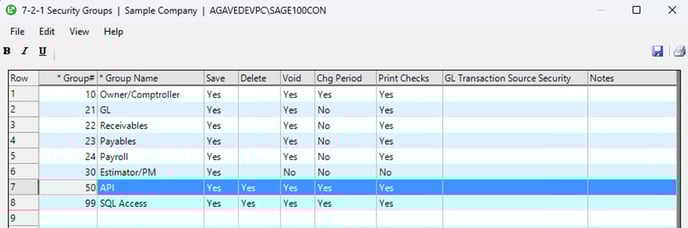
Next, log in to Sage 100 Contractor with Administrator rights for the target company (you can check “Open company with Administrator rights” when launching the company). Navigate to the menu 7 – Utilities → 2 – Company Security → 1 – Security Groups. In the Security Groups window, insert a new row to create a security group (for example, name it API). Set the Save and Delete permissions for this group to “Yes” (as shown in the screenshot above) and save the new group. Now go to 7 – Utilities → 2 – Company Security → 2 – User List. Find the user you created in Step 1 and add that user to the new “API” security group, then save. This ensures the integration user has the necessary rights in Sage 100 Contractor.
Step 3: Install the Agave Connector on the Sage Server
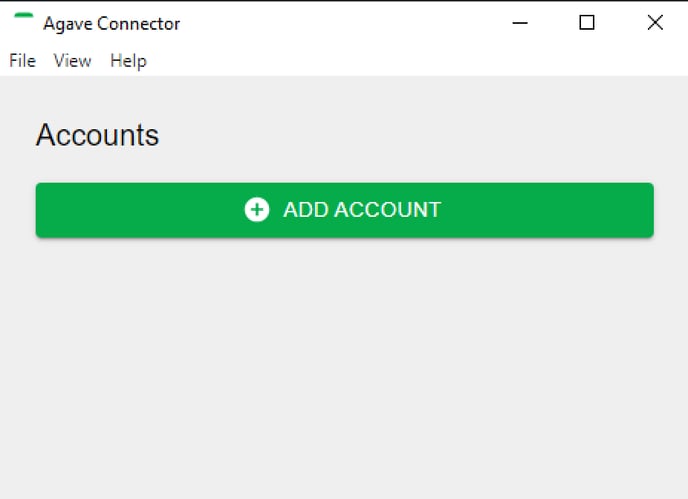
The Agave Connector is a small application that runs on your server to facilitate communication between Sage 100 Contractor and Followup CRM. We recommend installing it on the same server that hosts your Sage 100 database (for reliability and access) . To get the installer, contact the Followup CRM Support Team (email: support@followupcrm.com) to obtain the download link for the Sage 100 Connector installer . Once you have the installer (.exe), run it on the server and follow the prompts to install the Connector. After installation, launch the Agave Connector app (it may open automatically or be found on your Desktop) . You should see a window titled “Agave Connector” with an Add Account button (as shown above). Keep this application open for the next steps.
Step 4: Connect Followup CRM to Sage 100 through Agave
Now you will link Followup CRM with Sage 100 using Agave. In Followup CRM, navigate to your Integrations settings (or the Sage 100 integration setup page). From there, initiate the Sage 100 connection process – this will open a pop-up or page called Agave Link. In the Agave Link interface, click Sage 100 Contractor (select it as the system to connect) and then choose “Create Account.” This tells Agave that you want to set up a new Sage 100 account connection.
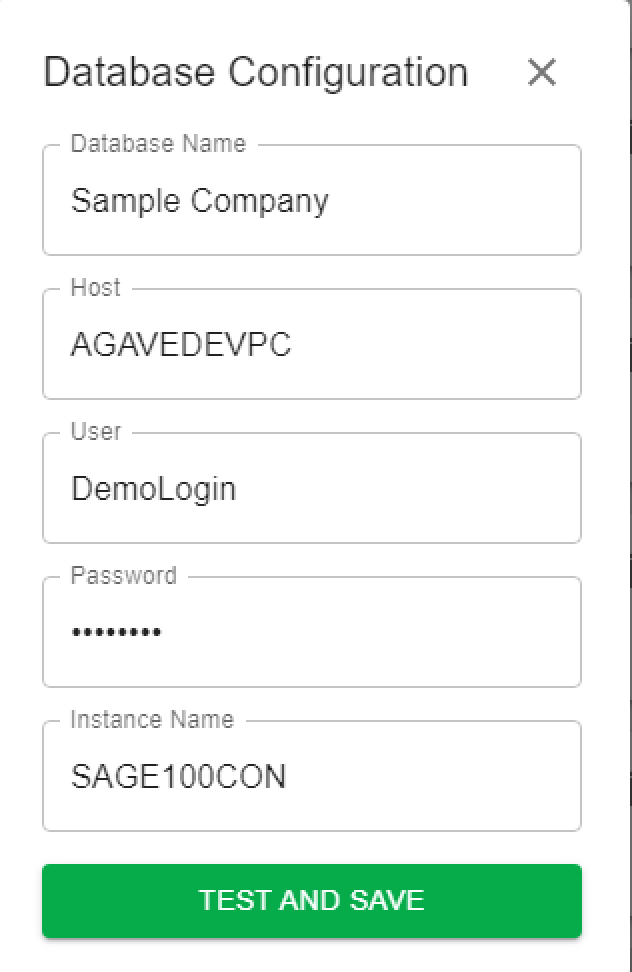
Meanwhile, on your Sage server, go back to the Agave Connector app and click the Add Account button to start adding your Sage 100 company account. A “Database Configuration” screen will appear where you need to enter your Sage 100 Contractor database details (see example below):
-
Database Name: The exact name of your Sage 100 company database. (This is the name shown in Sage’s Company List when you open Sage 100 Contractor; e.g. “Sample Company”.)
-
Host: The name of the server where the Sage 100 database resides. (For example, a server name or network path. In Sage 100’s Home & Resources tab you can find the server name used as the Host.)
-
Instance Name: The SQL Server instance name for Sage 100, if applicable (often “SAGE100CON” if using the default instance, or leave blank if Sage uses the default SQL instance).
-
User: The SQL username you created in Step 1 (the integration user, e.g.
agave-admin). -
Password: The password for the above SQL user.
Double-check that the information is correct, then click “Test and Save.” The connector will attempt to contact the Sage 100 database with those credentials.
Step 5: Complete Authentication and Validate the Connection
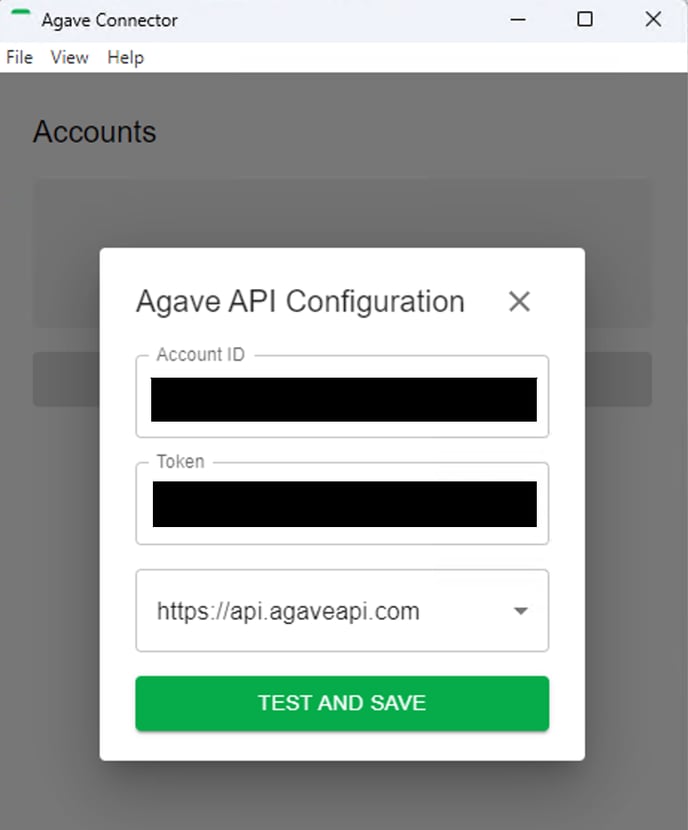
After clicking Test and Save, the Agave Connector will prompt you for an Account ID and Token in an “Agave API Configuration” window (as shown above). Now, switch back to the Agave Link screen in Followup CRM – it should have generated an Account ID and a temporary Token for the Sage 100 connection at this point (they may be displayed on screen after you clicked Create Account). Copy the Account ID and Token values from the Followup CRM’s Agave Link interface, and paste them into the corresponding fields in the Agave Connector’s configuration window. Once pasted, click “Test and Save” in the Agave Connector to save these credentials.
Next, return to the Agave Link prompt in Followup CRM and click “Validate Connection.” This action will verify the connection and complete the handshake. If the connection is successful, the Agave Link window will indicate success and then close automatically. Followup CRM will now be authenticated to access Sage 100 Contractor’s data via Agave. (Behind the scenes, Agave issues a secure token for ongoing API access after validation.)
Important: Keep the Agave Connector application running on your server whenever you want Followup CRM and Sage 100 to synchronize data. The connector must be open for API requests to go through. For convenience, you can configure the Agave Connector to run automatically in the background (for example, by setting it as an auto-start task in Windows Task Scheduler) so that it’s always on.
That’s it! Your Followup CRM account is now connected to Sage 100 Contractor. The two systems can communicate securely through Agave, and you can begin using the integration features (such as pushing or pulling project data) as needed. If you encounter any issues during setup or need assistance, please reach out to Followup CRM support via the in-app chat or support line – we’re here to help.